Temperature Probe

I have a “hobby charger” to charge my lithium-ion batteries for flashlights. Hobby chargers are meant for people who use remote control airplanes and things like that to charge the battery packs. They run off of 12 volts DC, like a car battery so you can take them in the field and charge up. They don’t come with a battery holder, just clips that you might attach to a battery pack which has a number of different cells in it. The charger can charge packs like that and can be configured for as many cells and whatever current you want. My lithium-ion batteries are all single cell, but the hobby charger follows the best charging routine for lithium ion batteries: it applies a constant current that you specify until the pack reaches its maximum voltage (usually 4.2 volts for a single cell), then holds that constant voltage and lets the current taper off until the battery is full. This is called CC/CV.

Anyway, one of the features of this hobby charger is that it can monitor the temperature of the battery. Some battery packs can get very hot while charging so, in addition to monitoring the voltage, current, time, and polarity, the charger can also make sure the temperature doesn’t get too high. Normally this isn’t a problem because I’m not charging at real high currents, but I thought it might be good to get a temperature probe anyway since the charger didn’t come with one. So I look it up where to get one and, because these are hobby people, they say build your own. All you need is an LM35, some wire and futaba plug that goes into the charger.

I looked up LM35 and it is a 3-prong electronic component like a capacitor or resistor. You apply 4-30 volts of power and the LM35 will output a voltage that tells you the temperature in degrees Celsius. A voltage of 0.300V is 30 degrees Celsius. It’s that simple. The range is -55 to 150 degrees, so it will even give you a negative output if the temperature is below freezing. What a neat thing. I found a place on eBay selling them for 99 cents with free shipping, so I had to order one. It is coming from Thailand, so it will be a while before I get it.

Then I went looking for a futaba plug and it wasn’t quite as simple, but I did find that you can actually just buy a pre-made temperature probe for $2.60, but it is currently out of stock, so I will get one later.

Archeology Dig

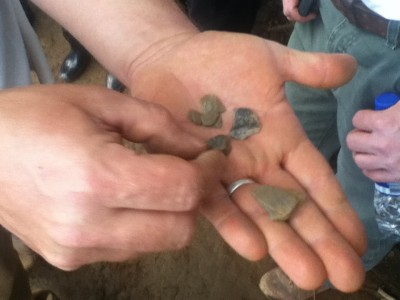
Today I got to go visit an archeology dig that is going on at a project I used to manage. The new road is going to go through an area where artifacts were thought to be located. It was interesting, but they aren’t finding as much stuff as they thought they would. Some archeologists find some really neat stuff, but this type of stuff is more about pottery shards and arrowheads, if they are lucky. In this case, they found the stem of an arrowhead. It is this tiny little piece of slate, but it seems intentionally shaped.

Continue reading “Archeology Dig”

3D Glasses

Everybody knows about 3D movies. You pay extra and you get some special glasses. These used to be red and blue, but now they are polarized. Red things are blocked by one lens and blue things are blocked by the other and your brain puts the two separate images it is seeing together and makes it seem like it is 3D. The polarizing works the same way except that you can’t tell what is polarized when you take your glasses off. So one lens blocks vertically polarized images and the other blocks horizontally polarized images. With your glasses off you just see double.

One of my favorite games on the iPod is Pinball HD. They recently came out with a new pinball table for 99 cents so I bought it. And it got me thinking more about the game. One of the features of the game is that it is 3D. Or it can be. The camera follows the ball and you can tell everything is rendered as if it were a real table. But you can only see the 3D effect with special glasses. I used to have some paper glasses that I got for sending a self-addressed stamped envelope off to somebody who was giving them away so people could look at Mars rover pictures in 3D. Then at some point I picked up some more where one eye is yellow and the other is purple. Well, the game doesn’t support yellow and purple, but it does support red-cyan (essentially red-blue), green-magenta, and yellow-blue (actually the paper glasses seem to work for yellow-blue, but it is very dark).

Since I like the game, I thought I would try to find some cheap 3D glasses online, so I went to DealExtreme. I searched for the term anaglyphic and jackpot! They have a lot of 3D glasses, entirely too many actually. You can get glasses with red on the right or left. You can get magenta on the right or left. And I learned something, which was the magenta-green is supposed to be an improvement over red-blue because movies and pictures often have a lot of red and blue already whereas there isn’t as much magenta and green (not real sure I believe that; green is pretty popular). If you are making a 3D movie you have to avoid the colors that are in the glasses (which is why polarizing works so much better). I thought I would try magenta-green, but I wasn’t sure which eye the magenta should go over. With red-cyan, the red almost always goes over the left eye.

The glasses ranged in price from $1.79 (shipped!) to $20. The $1.79 pair is the most popular, but one of the reviews said it was kind of tight. There was another one for $3.40 that included two pairs of glasses, but these seemed like they might fit over regular glasses. They also had clip-on 3D glasses, but those were a little more expensive. And they had two pairs of paper ones for $1.14. I figure for $3.40 I can’t go wrong. Now I have to wait 3-6 weeks for them to show up.


Moved the Wiki

In November 2010, I started the Flashlight Wiki after getting frustrated editing someone else’s wiki and being unable to stop spam attacks there. At the time, I purchased the domain flashlight-wiki.com as an alternative to flashlightwiki.com which was already taken but not used. Then, in November of last year, flashlightwiki.com was abandoned and I was able to purchase it.

I think generally it is better to have a domain without a hyphen in it because people might not remember to put the hyphen in when linking to the site or typing it in to their browser. So I knew that eventually I wanted to move the wiki, but I didn’t want to deal with it yet and was afraid that moving it might cause the site to lose page rank, which gives the site priority when people do searches on Google. I have been getting about 300 visitors a day, so I didn’t want to lose that, even though the site doesn’t generate any real revenue, with the small AdSense ad only generating a few dollars a month. Continue reading “Moved the Wiki”

Baked Flashlights

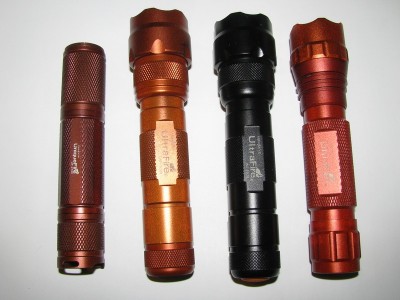
Today I was reading a post at Budget Light Forums where a guy baked (broiled, actually) a black flashlight in his oven and changed the color (link). Well, since he told a bunch of other people who also own more black flashlights than anyone could need, soon a lot of people were doing some baking. Some of the lights would turn orange or bronze. Some just turned brown or kind of purple. So naturally, it wasn’t long before I turned my oven to broil as well. I chose two lights that I don’t really like that much, one of which is an inferior copy of a light I do like. I took them apart and removed all the electronics, switches, o-rings, glass lens, and then put the aluminum parts back together. I tried one of them and it turned kind of purple. So I put the second light in there and then added a third light that I really do like. The color changed within about 30 minutes, though I kept the first one in the whole time to see if it got lighter. They all came out differently. Here is a picture of the three lights plus a control that was not baked.

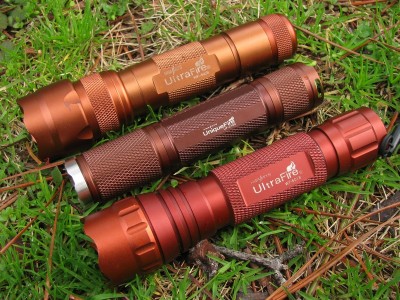
The first one is kind of chocolate brown, maybe like an old penny (here’s a post of what it used to look like). The second light looks like it is made from copper tubing and used to look exactly like the unbaked third light. The last light is sort of reddish brown, again maybe a shade of copper but with more red (before). Pretty neat.

Later on a guy posted a video on YouTube where he just puts the light directly on a burner of his gas range and cranks up the heat. Takes about 3 minutes that way. Later on after I put the lights back together, I took this picture. I’m really liking the way these turned out. Each one has a distinct color.From top, Ultrafire WF-502B, UniqueFire UF-2100, and Ultrafire WF-501B