
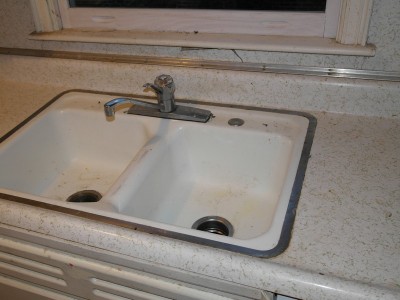
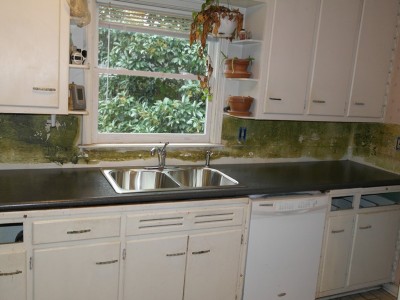
My kitchen has always needed some work. The green and white formica counters, the dripping faucet, the stained and cracked cast iron sink, the pink wallpaper, etc. I didn’t want to do a total renovation, but I figured I could update some parts. I went to Home Depot and talked to a kitchen designer and we charted out a makeover that would replace the counter, sink, faucet, flooring, and add a tile backsplash for about $2700. For the counter, the basic level is laminate or formica. Then there is a big jump in price to about 3 times that price where you can get granite, quartz, or Corian. I figured formica would be okay and less maintenance than granite. I picked out a Delta faucet that got good reviews and a thicker than average stainless steel sink from Kohler. One problem with the cast iron sink was that if I dropped a glass or dish in the sink, it was pretty much a gonner, but stainless is a little bouncier and hopefully will save some glassware. The same thinking was behind getting a vinyl floor instead of ceramic tile.
A few weeks ago, a guy came and measured for the counter and praised my choice of laminate over granite. He said the counter should be read “week after next” which would have been the week before last. The official estimate was 2-3 weeks. 3 weeks was last week. I was hoping they would install it on Columbus Day since I would be off anyway, but they sent me a notice saying it would be last Tuesday, the day after Columbus Day.
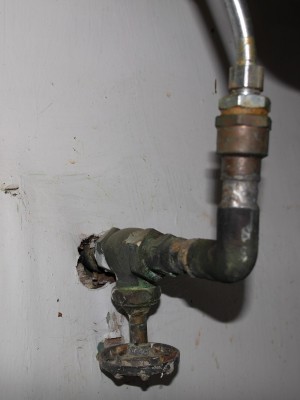
That was okay because after really thinking about it, I decided I wanted to replace the shutoff valves under the sink. I wasn’t sure how much I wanted a plumber to do, but obviously as little as possible since plumbing is so expensive. Re-doing the sink meant I would also need to reinstall the disposal and rebuild the drain lines. So in the end I figured I could just get the shutoff valves replaced and then I could take a stab at hooking up the supply lines for the faucet, dishwasher, and the drain lines and disposal. Here’s a picture of the old cold water supply. I think that is the galvanized piece in the middle of the vertical part.
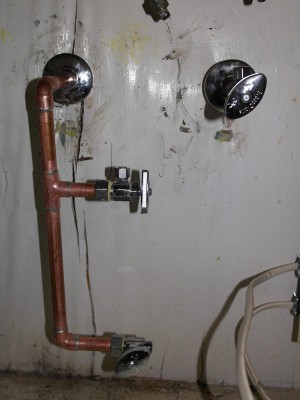
I called a plumber that some neighbors said was good and got positive reviews on Angie’s List and made an appointment about a week in advance, as soon as I learned when the counter would go in. He would disconnect the existing sink and I could do without the sink for a day until the counter and sink were in place. They were going to come by in the morning, but after they didn’t show up at 10, I called. They had no record of my appointment and said they could get out to me in the early afternoon. At 2:30 they still had showed up, but eventually got there at 3:30, but had to go to Home Depot for the shutoff valves I told them they needed to install. The plumber was able to take out the old pipes back to where they are in the wall, then screw in a new piece that he was able to solder some pipe into. From there he put a shutoff on the cold side, and then made a fork in the hot side with independent shutoffs for the hot water and the dishwasher supply. Part of what he took out was a couple of inches of old galvanized pipe, so maybe all of my galvanized pipe is finally gone (though no telling what is left in the wall since I can’t see it; one plan was to bypass the stuff in the wall and go down through the floor to the supply lines in the crawlspace but that was almost twice as expensive). The only thing bad about the work was that I asked for quarter turn ball valve shutoffs and instead he got multi-turn valves, but I guess these will work. One thing I wanted was for everything to be standardized for modern connections and I think I got that. I got rid of the old clunky copper tubing that supplied the dishwasher and installed a braided dishwasher supply line. Here are the new lines. The hot water with the fork for the dishwasher is on the left.
The next day I called Home Depot to see what time they expected to come out (actually I called the day before, but they said call the next day and didn’t even have the number for the installer). They said there was no appointment for installation and that if I got an email it must be a glitch. I said, well, I don’t have water in my kitchen anymore and I need the new sink and faucet. They said I was top of the list, but it was only yesterday that they called and set a time for this morning.
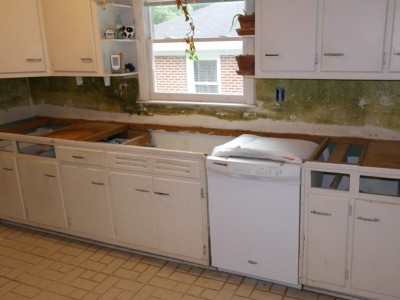
The guy showed up right around 9 AM and was instantly worried because he saw the cast iron sink. He said the owner of the company who had done the measurement, should have mentioned there was cast iron so he could have brought someone to help him lift the sink up. I said I could help out, but in the end he got it out by himself even though he said it probably weighed 200 pounds. Here is a progress picture with the old counter and sink removed. There is some really yucky looking green glue that was used to attach the formica to the backsplash area. It looks like algae or mold, but it is glue.
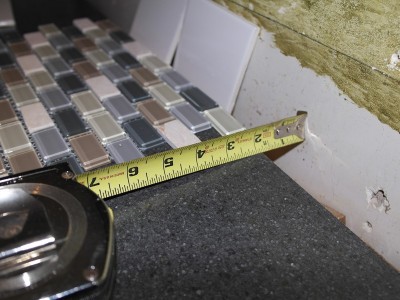
He got the new counter out of the truck and had it sitting on some sawhorses. Outside it looked a lighter gray than I thought, but when he brought it inside it looks like it is supposed to. But there were a couple of problems. The main problem was that after taking out the existing counter and backsplash, there was more room along the back than the owner had taken into account, so the counter fell short of the wall by almost two inches. If there was a small gap, the new tile backsplash might cover it. And it might be possible to build up the backsplash with wonderboard or drywall, but to get that much, the wall face would be out further than the window sill. So we decided they needed to fabricate a new piece, meaning I still can’t install the sink for another couple of weeks while they order some more formica of the kind I wanted and then build the counter.
Here is the gap, which is almost 2 inches. You can also see the counter, some white tile I will use for the backsplash and the glass tiles I will use as a stripe in the backsplash pattern for an accent.
I put the new sink (I had already attached the faucet) in place temporarily to see how it would it look. It looks pretty decent. Then I got the supply lines hooked up and went to Home Depot to get a new tail piece to put the drain line together again. It seems to work, but the sink isn’t centered in the hole just right, so I may have them modify the hole location in the new piece so I don’t have to change the plumbing too much. There are clips that lock the sink in place, but I haven’t installed those yet since I would have to take it all apart again.
The other problem, which you can kind of see in the picture is that there is a gap above the middle part of the cabinets. The installer thinks the weight of the cast iron sink held the old counter down tight and eliminated the gap. The new counter will be have a little bit of overhang on the front that should cover up that gap.
The tile you picked for the backsplash is going to look great. I really like the choices you are making. It’s a good thing you are patient like me.
You probably should water the plant on the top shelf on the right.
Mom and Carol commented the same minute!
Actually, I need to get rid of the dead part of the plant. There is some green back there.
I’m glad you like it, Carol!
I was just kidding about the plant! It is going to be very nice when all is done. I know it has been a headache.
Yesterday they came back and installed the new new counter. I called them about moving the sink opening and they said they would just wait until the installation to cut the opening for the sink. They left the ill fitting counter in place last time just loosely, so I had connected the sink, dishwasher, disposal, and drains in order to use the kitchen, so they disconnected all of that. I showed them what I was trying to do with placement of the sink over the drain and they took a measurement and wound up getting it just right. The counter backs all the way up to the wall, but they made the counter a constant depth and one end overhangs about 3/4″ more than the other end because that end of the counter isn’t as deep. I think they could have balanced that out somewhat by adjusting the depth, but whatever. They secured it down and set the sink in place. When they screwed the countertop down to the cabinets, the gap between the middle of the counter and the cabinets under the sink disappeared. That’s good because they put the same front edge as before instead of making a lip that would cover the gap. I still can’t use the pull-out boards, but I never used those anyway.
I went on to work with the sink just sitting there loose. When I got home, I read the instructions about installing the clips that hold the sink down to the counter and also realized I needed to seal the sink with silicone. I looked in my utility room and found a really old tube of silicone for a caulk gun and used that, which I guess will work, but I think maybe it will never actually harden past where it is already. So it’s kind of just like paste. Before I tightened the clips, I put all the drainage together to make sure the sink was in exactly the right spot above the drain. The instructions said put the clips close to the corners, but I think it would have been better to space them evenly instead. I have a socket set with deep sockets which are perfect for tightening the nuts on the long bolts of the clips. Then I just had to connect the supply lines and using some teflon tape on the threads. Everything worked great first try. No drips, no leaks.
Since it has been a couple of months now since I got the estimate for the floor and backsplash, I think I need to go back to Home Depot and see if they need to make any changes and then sign up to get that work started.