
A couple of weeks ago the switch on my Palm TX stopped working. I did some searching and found a good post on a Palm forum by Woz of Oz (if it is not Apple co-founder and Dances With the Stars contestant Steve Wozniak, it is someone who wants you to think it is him) that said you can use the center button to turn on the Palm and get the clock pop-up, which leaves you in whatever program you were in last (whereas the Calendar, Memo, and other buttons turn the Palm on but take you to those programs). So I have been doing that lately. To turn it off you just wait a minute and it goes off on its own. I’m hoping Apple releases a nice update to the iPod Touch next month and I can use that instead of the Palm.
I also found a link to a repair that can be done where you take the Palm apart, then clean out the switch and if you get rid of the dirt that might be in the switch you can make the switch work again. It was on an Instructables page with pictures and some explanation, with comments from a few people who had done it successfully. Though it had pictures, the instructions were not as detailed as I would like. But I couldn’t do them anyway because you need a tiny little Torx screwdriver (star shaped) size 5 and the smallest I had was a size 8 (which I used years ago to take apart my Powerbook 520c and do a hinge repair).
This week a guy at work asked me if I could fix an old Palm m515 that he found in a drawer nearly in mint condition. He has been using his m515 for years and it is showing its age, so he wanted to use this new one, but the problem was it wouldn’t hold a charge (because it had been sitting in a drawer all this time and the battery charged all the way down to zero, never to return). It worked fine in a cradle, but as soon as you took it off the cradle, it wouldn’t turn on. I said he could leave it with me and I would see if I could do anything with it. I found out that the battery isn’t too bad to replace, but again I would need a Torx 5 screwdriver. So I ended up buying one which I will write about later. I had bought Susan a Palm m500 for her birthday one year, but she stopped using it eventually after the tap screen started doing weird stuff and gave it back to me before she moved. I found out it used the same battery as the m515 so I thought I could do a battery swap. A few years ago I had tried something similar with Palm V’s and was not remotely successful, but the Palm V was glued together and you had to melt the glue with a hot air gun (if you weren’t careful you would melt the buttons or screen instead of just the glue) and then pry the very well-glued battery off the back of the touchscreen, which I did too forcefully and wound up cracking the screen. Sad story, but now I have a working Palm V and my old Vx that I never use anyway.
Being able to take the thing apart with screws would make one part of it much easier. So I got the screwdriver and fortunately it was a set of different bits because it turns out the m500 uses a Torx 6 screw and the Torx 5 driver is useless for it. I took apart the m515 first since I had the least to lose with it and was surprised how easy it was to take apart. The plastic tools I had gotten with my iPod battery replacement kit were good for releasing the catches inside the case without bending the aluminum back. The battery was glued in place, but they used a lot weaker glue this time and it wasn’t too bad getting it off of there. It also has a tiny little plastic plug so that you can just unplug the battery. Good job, Palm.
Then I opened the m500 and was able to get that battery out and plug it in to the m515, snap the case back together, put the screws back in, and it works like a charm! I put the bad battery back in the m500 and it is just as dead now as the m515 used to be.
Encouraged by this success I turned to fixing my switch. I was able to take the screws out easily enough, but the TX has more parts to the shell and some of the different circuit boards are connected together (though with tiny ribbon cable plugs, so you can get them apart fairly easily). Although the battery is fine now, its wire leads are soldered into the circuit board so it won’t be easy to replace if that day ever comes. The Instructables page said to desolder the switch for cleaning, but commenters said you could pry open some holders and get the switch out without desoldering. This switch mechanism is super tiny with parts not much bigger than grains of sand.
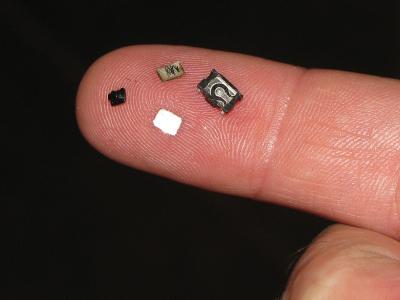
I used an eyeglasses screwdriver tip to pry the prongs and then the switch fell apart into 4 tiny pieces. They didn’t look dirty and it took a long time to get everything back together. As I was prying the prong back to hold the switch in place, it broke off completely so the switch is completely shot now. It can’t hold itself in place anymore. It wasn’t nearly as easy to put the TX back together, but I was able to do it successfully. Now I will need to get that program that turns one of the buttons into a power switch that Woz of Oz was talking about.